- NOLS Wilderness First Aid (WFA) training
- The NOLS Wilderness First Responder (WFR) handbook
- Wilderness Medical Associates’ field protocols for Wilderness First Aid certified professionals
This article is obviously not a substitute for proper medical training, and you shouldn’t be used in place of good judgment. If you’re interested in leaning more I’d highly suggest taking a full Wilderness First Aid (WFA) or Wilderness First Responder (WFR) class.
Here is a quick look at the six injuries that are most common in the backcountry:
- Wounds & Infections
- Burns
- Knee & Ankle Injuries
- Blisters
- Dehydration
- Shock
Wounds & Infections
With lots of sharp tools, jagged edges and rough surfaces, there are all sorts of hazards that can lead to cuts, scrapes and puncture wounds in the backcountry. Knowing how to treat a serious wound and prevent it from getting infected is an extremely useful first aid skill.
Anytime you have substantial blood loss there’s an immediate risk of “bleeding out.” The average adult human has 5-6 liters of blood in their body – picture 5 nalgenes. When you donate blood, they take half a liter (500ml) which the body can easily handle. If you lose one to two liters of blood, you’re going to go into shock (more below). Anything more than two liters of blood loss and you’re in dire straits.
Controlling Bleeding
Most forms of bleeding can be stopped with a combination of direct pressure onto the wound and elevation of the wound above the heart. Always make sure you put on gloves before touching someone else’s blood, I carry a few pairs of these in my first aid kit.
Hand the patient a piece of clean gauze and tell them to put pressure on their own wound as you put your gloves on. If the gauze is getting saturated, add more gauze on top but do not remove any existing gauze that’s already in the wound.
If the situation requires your hands to be free, or you’re having trouble keeping pressure on the wound, you can make a pressure bandage. Place gauze over the wound and wrap it tightly with something like an ace wrap or bandanna. Your goal is not to make a tourniquet, you should be able to slide two fingers under the wrap and the patient should have no tingles or loss of feeling in the extremities.
Preventing Infection
Once the bleeding has been successfully controlled, the next steps to think about are preventing infection and promoting healing, especially if your plans call for you to still be out in the backcountry for several more days.
The first step is to wash, or “irrigate” the wound with at least half a liter of clean water. The goal is to flush out any dirt and germs that have already made their way into the wound and under the skin. Ideally you use something with high pressure like a syringe or the backwash pump that comes with the Sawyer Mini Filters. If there are any large pieces of dirt that you can see in the wound, be sure to pull those out carefully with tweezers.
Most first aid kits have alcohol wipes, which should be used to wipe the skin around the wound, but should not be used to clean inside the wound, since they can damage good tissue. Now that the wound is relatively clean, you can cover it with antibiotic ointment and then clean gauze and a wrap to hold it all securely in place. Note that antibiotic ointment is not a substitute for good wound cleaning, so make sure you get things nice and clean before applying it.
You’ll want to check on the wound once or twice a day to reapply the ointment and monitor it for signs of infection. A little bit of swelling, warmth, redness and puss is normal to see as the body fights off bacteria. But if the symptoms get more extreme – hot to the touch, bright red, hardening skin, painful and itchy – then that’s a sign that the body is losing its battle against an infection and you need to step in.
You’ll need to open the wound back up and re-clean it very thoroughly with at least a full liter of water. It also helps to soak the wound in the warmest water that the patient can tolerate (without causing burns). If you have pain killers or antibiotics, ask the patient about them and consider using those as directed.
If a wound is going to get infected, it will usually show up in the first 24-48 hours. You should stop the trip and evacuate any patient where you can’t control the bleeding or there are persistent signs of a bad infection.
Burns
On camping trips, you’re likely to be handling fire, boiling water and hot pots with primitive tools. Burns are another common risk that you should be aware of in the backcountry. This also includes sunburns, since those are also burns, albeit much more minor.
The very first step for treating any burn is to stop the burning process. Remove whatever the source of heat is and immediately cool the affected area with cold, clean water. Depending on the thickness of the burn, it may take several minutes of soaking in cold water before the burning process has stopped.
Once the burned area has cooled off, you may want to scrub the area with clean water and a bit of mild antibacterial soap, if it’s available. The goal is to prevent infection if the burn goes deep into the skin.
Next you should cover the burned area with antibiotic ointment and clean gauze or clothing. This will help protect the burn site, and also help reduce the patient’s pain. Feel free to offer the patient ibuprofen as well, as there will usually be substantial pain.
For burns in extremities, keep the burned area elevated to reduce swelling. For more long-term care, it’s important to keep the patient warm and well-hydrated since the major risks to life are fluid loss (see dehydration and shock, below).
Evacuate any burn patient if the burn:
- exposes deep layers of skin or bone
- is circumferential, going completely around a limb
- is on sensitive areas like the face, groin, armpit, hands or feet
- covers a significant part of a patient’s arm, leg or torso
Knee & Ankle Injuries
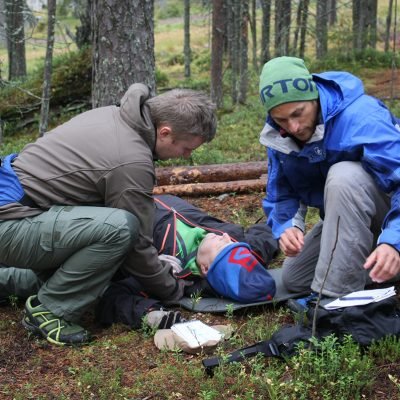
According to a Reddit AMA with search and rescue volunteers, soft tissue injuries are the most common things that people need to be rescued for. And while an injured wrist, elbow or shoulder might be inconvenient, lower body joints like knees and ankles can have a serious impact on your ability to hike out on your own.
Whether they’re chronic injuries that flare up from over-use or sudden injuries from a bad step on steep or uneven terrain, it’s important to stop and address soft tissue injuries. Trying to “tough it out” can lead to permanent, lifelong injuries that require ongoing physical therapy.
I can speak from personal experience on that, I took a bad step on a mountaineering expedition years ago and kept hiking down the mountain on it – it still bothers me to this day, whenever I do too much hiking on it. 😢
As a lay-responder, your job isn’t to diagnose whether it’s a strain, sprain, tear, fracture or other specific injury. Your goal should simply be to diagnose whether the injured joint is usable or unusable.
“Usable” Injuries
 If the patient still has most of the mobility in their joint and can comfortably put weight on it, then you can support the injury by wrapping it with athletic tape or an ace bandage.
There are also special-made wraps you can buy for various joints at stores like Walgreens or CVS. If you have a chronic injury in a knee or ankle, it’s a good idea to strap one of these on before you head out into the woods at all.
If you’re able to keep hiking on it, albeit gingerly, make sure you take sufficient time to address it when you get to camp.
The common RICE acronym is your guide:
- Rest – especially if each use causes pain, which is a sign of tendinitis
- Ice – alternate 20-30 minutes of cooling with 15 to naturally rewarm
- Compression – wrap securely with an ace wrap, making sure circulation is preserved
- Elevation – have the patient lie down on a sleeping pad and elevate their feet on a backpack or two
If your schedule allows you to take a day to rest the injured joint, this can go a long way to preventing complications and letting it heal. If you can keep the injury cold, compressed and elevated, this will help reduce swelling and make it more likely you’ll be able to continue hiking on it again shortly.
“Unusable” Injuries
If the patient can’t easily move the joint through its full range of motion or feels pain when putting their weight on it, then the joint should be considered “unusable” and treated as such. Note that an injury that starts out as usable may become unusable if the patient continues to hike on it, or swelling starts to set in.
For treating unusable joints, you want to splint the joint in a comfortable position:
- For ankle injuries, keep the foot at 90 degrees to the lower leg
- for knee injuries, bend the knee about 5 degrees from straight
You want to pad the injured joint with whatever is available – jackets, sleeping pads, clothing, etc. You also want to add something stiff like a hiking pole or canoe paddle to keep the joint from moving at all. Finally, wrap everything with something wide like a belt or webbing, and cinch it all tight. Remember this equation:
padding + compression = rigidity
Keeping it tied tightly will help hold everything together firmly as you begin your long, slow hike out. You will likely need to stop and readjust things often, whenever the patient is sufficiently uncomfortable.
Remember that you never want to tie anything so tight that the patient loses feeling in their extremities. Check periodically to make sure you can slide two fingers into the splint and that the patient can still wiggle their toes and has feeling in their toes when you touch them.
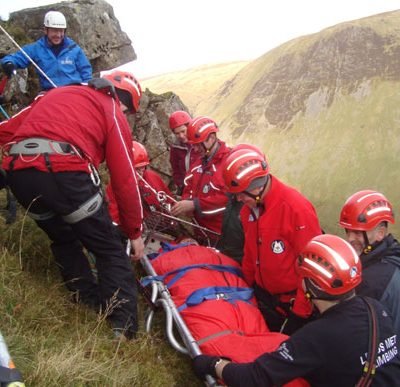
If the injury is so bad that there’s no way the patient will be able to hike out on it – like if bone is protruding through the skin – you’ll need to send someone to fetch professional help.
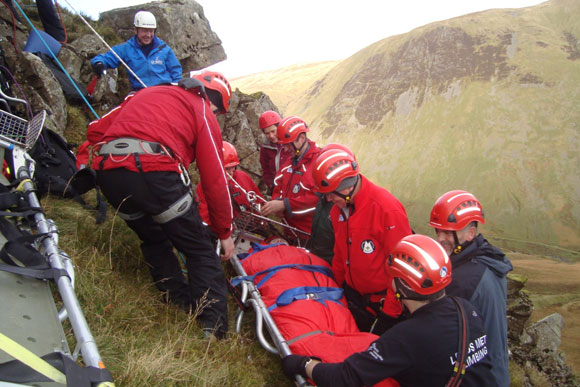
Note that even the fastest search and rescue teams will take a few hours to reach you, and that being packed and carried out in a litter is generally a pretty terrible experience for everyone involved. Don’t expect most local SAR agencies to send a helicopter, you should encourage the patient to hike out in a splint if you don’t think it will complicate the injury.
Blisters
While not technically a medical emergency, blisters are one of the most familiar backcountry injuries to many people, and can certainly go a long way to ruining your trip if they’re not handled well. Blisters are also one of the most misunderstood backcountry injuries, and there are a lot of conflicting tips on what to do – the NOLS mythcrushers even tackled the issue:
A blister is formed when thick skin – like on your palms or feet – is rubbed, and it begins to separate from the softer, more sensitive skin beneath. Blisters are especially likely to form when the skin that’s being rubbed is warm or sweaty, which is exactly the conditions you’ll find inside most hiker’s boots.
With blisters that don’t occur on the foot, your best bet is just to leave them be. But if you have a firm, fluid-filled blister is on your foot you don’t really want to “tough it out” and risk having the blister pop inside your dirty, sweaty sock – leading to an infection (and a gross sock). It may also be too painful to continue hiking at all if the blister has grown too large.
To treat blisters, the best option is to carefully and slowly drain it, and then treat it like a minor wound. This will relieve the pressure and allow you to continue on your way.
Begin by washing the area around the blister thoroughly with water and then an alcohol pad. Sterilize a sharp point with either alcohol or by holding it over a flame.
To reduce the risk of cutting a jumpy, antsy patient, hold the sharp point so that it’s nearly parallel with the skin of their foot, and slide it up into the bottom of the blister’s roof. The skin of the blister should be dead, so the patient should only feel the tug of your point lancing the outside of the blister, not any sharp pain.
Once you’ve lanced a hole in the blister, leave the rest of the roof intact to protect the inner layers of skin. Give the blister at least a few minutes to drain, applying light pressure to help squeeze out the fluid. Then cover the area with antibiotic ointment to prevent your lanced hole from getting infected.
Some people use a donut of moleskin around the blister to hold the ointment in place, and then another piece of moleskin or tape over top to keep it all together. There are also products like 2nd Skin Blister Pads that you can slap over a lanced blister to help protect it.
Some people really don’t like the idea of another person sticking a knife into their foot, but the relief that comes after the blister has been drained is usually well worth the anxiety involved in lancing it. There’s no need to evacuate a patient with a friction blister, unless you’re starting to see signs of infection.
Dehydration
Like blisters, dehydration isn’t often a major, life-threatening situation, but it can certainly create issues if people aren’t watching out for it. Being well hydrated helps keep joints lubricated, muscles healing and your digestive system chugging along. Water also supports crucial brain function. Letting yourself or those in your group get dehydrated can make all sorts of other issues more likely.
Mild dehydration is something that we’re all familiar with – dry lips and a mild thirst. More severe dehydration can lead to fatigue and joint soreness, and eventually to irritability, frustration and poor decision making as the brain begins to shut down. This is especially likely if you’re also suffering from heat-stroke, but even in cold environments, dehydration can sneak up, so it’s important to know the signs.
I always think of dehydration like those Snickers commercials – you’re not you when you’re dehydrated.
To ensure everyone in your group stays hydrated, remind them of these simple rules:
- If you’re not peeing every 4-5 hours on the trail, you’re probably dehydrated
- If your urine isn’t clear, copious and bubble-free, you’re probably dehydrated
It’s also important to remember that dehydration also comes from a loss of key electrolytes like sodium and chloride. Ideally, someone in your group brought powdered sports drink mix to share, and everyone is consuming salty snacks like peanuts.
Shock
Shock is the body’s response to a sudden drop in blood pressure, in order to prioritize blood flow to the brain and other vital organs. Shock is a common response to major trauma or bleeding, or it could also be an issue with the heart not pumping enough, or blood vessels dilating and not maintaining high enough pressure.
Imagine that you’re trying to take a shower in a cabin on top of a mountain, and the shower is fed with lake water from the base of the mountain. If you turn on the shower head and nothing comes out, there could be three potential issues:
- The pump at the bottom of the hill (ie, your heart) isn’t putting out enough force to move the water adequately
- The water itself (ie, your blood) is leaking out of the pipe, or there just isn’t enough of it
- The pipes between the pump and the cabin (ie, your blood vessels) are too wide to maintain good pressure
In this analogy, you can think of the flow of water from the shower head as the flow of blood to your body’s various tissues. While a non-functioning shower is a big annoyance, if your tissues aren’t getting the blood flow they’ll need, that can cause life-threatening issues.
The various causes of shock are outside the scope of an article like this, but as a responder, you should look for signs of shock whenever there’s major injury or someone is feeling really off. Symptoms include:
- anxiety or confusion
- rapid pulse and rapid, shallow breathing
- cool, pale clammy skin
- weakness, dizziness, lightheadedness
- nausea and vomiting
If you are able, you want to focus on treating whatever is causing the person to be in shock. But also keep these treatments in mind for any patient that’s exhibiting signs of shock:
- keeping the person calm and reassured – by staying calm yourself – helps lower their heart rate
- try to reduce their pain and discomfort by having them lie down on a sleeping pad in a comfortable position
- elevate their feet on a backpack (unless you suspect a back injury) to keep blood in their core
- even if it’s not freezing cold, wrap them in a sleeping bag and try to keep the patient warm and dry
- if the patient is able to drink on their own, make sure to keep them hydrated – but never force them to drink if they might choke
Any patient who is exhibiting signs of shock will likely need to be evacuated with professional help. As you’re waiting for help to arrive, it’s a good idea to keep a log of the patient’s heart rate and mental status every 10 to 15 minutes. You will be able to hand this information off to rescuers to help their evaluation when they arrive.
Learn More
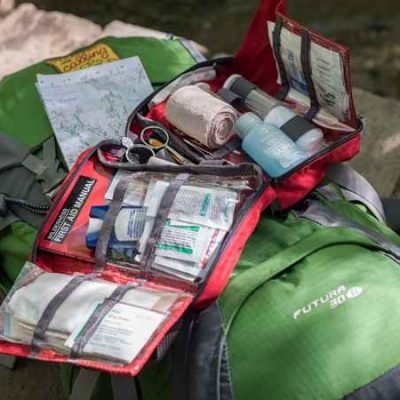
Well that’s 3500 words to get you started with the basics of wilderness medicine. Want to learn what I always carry in my first aid kit?
Check out this blog on Essential items to carry in your backcountry first aid kit.
If you love learning about this stuff, I’d highly recommend checking out a local Wilderness First Aid class. Some reputable companies that teach wilderness medicine include:
- NOLS’ Wilderness Medical Institute
- SOLO
- Wilderness Medical Associates
The wilderness medicine community is full of some of the smartest, most interesting people I’ve ever met, and taking a class is also a great way to meet up with like-minded adventurers in your area.
If you can’t find a class near you, or if you want a handy reference or some not-so-light bedtime reading, I’d definitely recommend picking up a copy of Wilderness First Responder: How To Recognize, Treat, And Prevent Emergencies In The Backcountry.
Make sure you share this information with other people you often head out into the wilderness with. You never know when it could save their life – or yours.
Article by: Hartley Brody
Be sure to check out this awesome adventure blog for more great content:
https://adventures.hartleybrody.com/